När du arbetar med Matplotlib i Python spelar utseendet och klarheten i dina visualiseringar en avgörande roll för att förmedla information effektivt. Matplotlib tillhandahåller enkla metoder för att ändra figsize i matplotlib antingen globalt för alla plotter eller individuellt för specifika visualiseringar, vilket ger användarna flexibiliteten att optimera sina plots för olika applikationer och sammanhang. I den här artikeln kommer vi att se hur du ändrar storleken på figurerna i Matplotlib i Pytonorm .
Hur använder man den för att plotta?
Huvudsyftet med Matplotlib är att skapa en figur som representerar data. Användningen av att visualisera data är att berätta historier genom att kurera data till en form som är lättare att förstå, och lyfta fram trender och extremvärden. Vi kan fylla figuren med alla olika typer av data, inklusive axlar, en grafplot, en geometrisk form, etc. När vi ritar grafer kanske vi vill ställa in storleken på en figur till en viss storlek. Du kanske vill göra figuren bredare i storlek, högre på höjden osv.
Öka eller minska plotstorleken i Matplotlib
Detta kan uppnås genom ett attribut av Matplotlib känd som fikonstorlek . Attributet figsize tillåter oss att specificera bredden och höjden på en figur i enhetstum.
Python matplotlib.pyplot figsize Syntax
Syntax: plt.figure(figstorlek=(bredd, höjd))
Parametrar :
latex i fontstorlek
width>: Figurens bredd i tum.height>: Figurens höjd i tum.Attributet figsize är en parameter för funktionen figure(). Det är ett valfritt attribut, som standard har figuren dimensionerna som (6.4, 4.8). Detta är en standardplot där attributet inte nämns i funktionen.
Ändra fikonstorlek i Matplotlib
Nedan är exemplen med vilka vi kan ändra figsize i matplotlib:
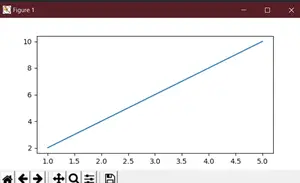
Exempel 1 : Ställ in figurstorleksargumentet
I det här exemplet skapas en Matplotlib-figur med måtten 6 tum på bredden och 3 tum på höjden och används för att plotta den linjära ekvationen �=2� och =2 x . Den resulterande grafen visar de plottade punkterna i denna ekvation.
Python3
# We start by importing matplotlib> import> matplotlib.pyplot as plt> # Plotting a figure of width 6 and height 3> plt_1>=> plt.figure(figsize>=>(>6>,>3>))> # Let's plot the equation y=2*x> x>=> [>1>,>2>,>3>,>4>,>5>]> # y = [2,4,6,8,10]> y>=> [x>*>2> for> x>in> x]> # plt.plot() specifies the arguments for x-axis> # and y-axis to be plotted> plt.plot(x, y)> # To show this figure object, we use the line,> # fig.show()> plt.show()> |
>
>
Produktion:
Detta fungerar om du använder en annan python-IDE än Jupiter-anteckningsböcker. Om du använder Jupiter-anteckningsböcker, skulle du inte använda plt.show(). Istället skulle du ange i koden direkt efter import av matplotlib, %matplotlib inline.
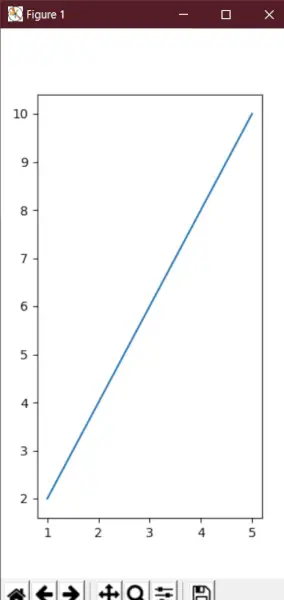
Exempel 2: Ändra figurstorlek i Matplotlib
För att se den dynamiska karaktären av figurstorlek i Matplotlib måste vi nu skapa en figur med dimensionerna inverterade. Höjden blir nu dubbelt så stor som bredden.
Python3
# We start by importing matplotlib> import> matplotlib.pyplot as plt> # Plotting a figure of width 3 and height 6> plt_1>=> plt.figure(figsize>=>(>3>,>6>))> # Let's plot the equation y=2*x> x>=> [>1>,>2>,>3>,>4>,>5>]> # y = [2,4,6,8,10]> y>=> [x>*>2> for> x>in> x]> # plt.plot() specifies the arguments for> # x-axis and y-axis to be plotted> plt.plot(x, y)> # To show this figure object, we use the line,> # fig.show()> plt.show()> |
>
>
Produktion:
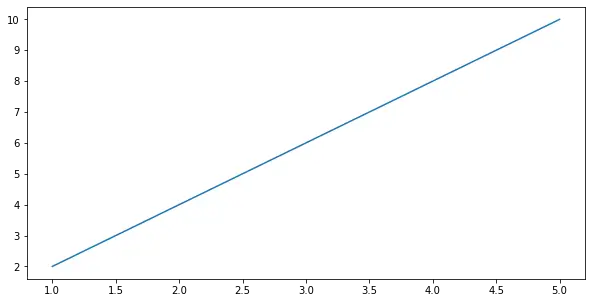
Exempel 3: Ställ in höjden och bredden på en figur i Matplotlib
I det här exemplet kommer vi att se att istället för att bara använda figsize kan vi också ställa in höjden och bredden på plottet med set_fighteight() och set_figwidth() funktioner.
bash sträng längd
Python3
# We start by importing matplotlib> import> matplotlib.pyplot as plt> # Plotting a figure of width 10 and height 5> fig>=> plt.figure()> fig.set_figheight(>5>)> fig.set_figwidth(>10>)> # Let's plot the equation y=2*x> x>=> [>1>,>2>,>3>,>4>,>5>]> # y = [2,4,6,8,10]> y>=> [x>*>2> for> x>in> x]> # plt.plot() specifies the arguments for x-axis> # and y-axis to be plotted> plt.plot(x, y)> # To show this figure object, we use the line,> # fig.show()> plt.show()> |
>
>
Produktion:
Exempel 4: Ställ in höjden och bredden på en figur i tum
Här kommer vi att se ett annat exempel på att ställa in figurstorlek i tum med hjälp av set_size_inches .
Python3
# We start by importing matplotlib> import> matplotlib.pyplot as plt> # Plotting a figure of width 5 and height 5> fig>=> plt.figure()> fig.set_size_inches(>5>,>5>)> # Let's plot the equation y=2*x> x>=> [>1>,>2>,>3>,>4>,>5>]> # y = [2,4,6,8,10]> y>=> [x>*>2> for> x>in> x]> # plt.plot() specifies the arguments for x-axis> # and y-axis to be plotted> plt.plot(x, y)> # To show this figure object, we use the line,> # fig.show()> plt.show()> |
windows kommando arp
>
>
Produktion: